Wednesday, March 9, 2011

Pinch Pot creatures

This project was a favorite among my 5th graders this year. All of their pieces turned out great and students were able to learn and practice new clay skills.

Students began with a ball of clay which they then rolled and made very smooth. Then, they stuck their thumbs in their balls of clay to form pinch pots. Each student then took their pinch pot, turned it on its side, then scored and slipped features onto the pot to create creatures. This was a great creative outlet for the kids.


After the projects were bisqued, the students were then able to glaze their projects. They looked amazing when they came out of the last firing. This is a project I will keep for next year for sure.


This one lost his eye in the bisque firing. I glued it on later, after it was glazed


Wednesday, September 29, 2010

Marbling Made Easy

This project is way fun and turns out soooo cooool! I did it with my 6th graders when teaching about color, but I think it could be done with younger grades as well. This could be done with any size paper, I decided to make mine small because I used small containers to create them in. We made 4 (1 using primary colors, 1 warm, 1 cool, and 1 complimentary) and then glued them all onto a black sheet of paper. Here is how to create this cool marbling effect:

1. Layer about 1 inch of Shaving Cream onto a paper dish (or trays) *I bought my shaving cream at the dollar store. They had huge cans for just $1!
2. Level it out with a piece of cardboard as a scraper
3. Use water based paint. I used the water colors. Paint directly on top of the shaving cream. Use different compositions like concentric circles, stripes, half moons, etc.
4. Then using the back of the brush or a pointed stick or tooth pick. Swirl the paint. Do not push it down deep into the shaving cream. The paint will stay on the top.
5. Cut paper small about 6"x4." Lay paper on top of the design and press down  (printing technique). Pull the paper off. The shaving cream will appear to be all smeared but wait.
6. Use the piece of Posterboard. to squeeze off the excess shaving cream. Like magic, the design stays on the paper. 
You can reuse the shaving cream until it gets drab. Just mix it in and paint again and again. 


Tuesday, September 28, 2010

Keith Haring Dance Party

 This week, the fifth graders were introduced to Keith Haring. They loved his style, and many even recognized it from today's pop culture. For this project, We used his simplified style for drawing people and his rhythmic motion lines. The students were instructed to create a dance party using Keith Haring figures -the guidelines were to include at least 5 people, make sure that none of the people were shorter than their tallest finger, and to fill the space between all of the people with motion lines and shapes -That way, even though there aren't many indicators about where these people are, we still know they are moving around a lot and showing plenty of motion:)


Thursday, April 15, 2010

Thiebaud Cakes

Our second grade learned all about the dessert-loving artist Wayne Thiebaud and then did a project inspired by his work. We began by drawing a cylinder shape that took up most of an 8.5" x 11" white sheet of paper. We then drew the cake missing a piece. We did this by drawing two parallel lines going up onw of the sides of the cakes. Then we made a little dot in the center of the top of the cake and connected to tops of the 2 parallel lines to the dot. We then erased the horizontal lines from the cake that were trapped between the two parallel lines. Students were then instructed to pick what flavor their cakes would be and then color in where the cake had been cut accordingly (ex: mine above is chocolate with strawberry filling). All coloring is done with oil pastels because it creates a great texture. Students then color/decorate the rest of their cake.

When finished coloring, students will cut our their cake and then put it on a sheet of 8.5 x 11" colored construction paper to create their cake stand. Cut that out. Then lay your cake on the stand on a 12" x 18" different colored piece of construction paper and glue down. As a finishing touch, draw the glass cover using a piece of white chalk.

Pattern High Five

This is a great colored pencil project. We started with a plain piece of paper that had a 1/2" grid on it  with diagonal lines through each square in the grid. You can kinda get an idea of what it looked like by looking at the pictures. I had the students draw on the back of the paper (the blank side), so they could still see the grid through the paper, but the finished product didn't have all of those distracting lines.

First, Students lightly traced their hand somewhere on the page. Then they chose a pair of complementary colored pencils to work with. One color would be for the hand and the other for the background. In each 1/2" square, there are 2 triangles. They were instructed to color the bottom one darker by pressing harder and the top one lighter by pressing more lightly with their colored pencil. This is a time consuming project, but it turns out amazing!
This student is about half-way done


This student got very creative and fit 2.5 hands and used 3 pairs of complementary colors:)

Monday, April 5, 2010

Shape Chain

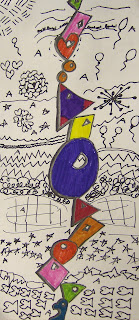
This lesson is great because it covers so many elements of design -shape, line, color, form... We start off using pencil to draw different shapes starting at the bottom of the page all the way to the top. Each one needs to be touching in some way, as to create a chain connecting the bottom of the page to the top. Students then have the option to create holes/cut-outs in the shapes. They then draw in the shadows on the side of each letter and inside each hole. Students then go over all of their pencil lines with permanent marker and then create different line design in the background. Now they are ready to color in each shape using bright colored markers. By leaving the background in black and white and adding the shadow to the shapes, it really makes them pop!

The Dot

I love Peter Reynolds. We read the book The Dot and then created our own dot paintings. We began by using permanent markers (because you can't erase any mistakes this way). The kids drew a dot somewhere on the page and then just went with it. They filled their whole page and then painted it in with watercolors. This is a great lesson for helping students get over perfectionist anxieties:)